#corevalues

Making Connections: Explore Your Core and The Spine

Recently, we have been exploring the #spine on the blog. Now it is time to put your new found knowledge to work!

Take a look at the gallery of exercise images from our #corevalues series #moveit and get the exercise details here. Your spine moves in 4 major ranges of motion- flexion, extension, twisting and side bending. This #moveit series takes you through all of these planes using your core to move your spine!

Shorty Swan: The Spine

Hi there! Today I want to break down the different parts of the spine.

When speaking anatomically, the spine is seperated into a couple different regions. The vertebrae are counted from the top down. Your cervical spine (C1-C7) holds your skull at the top and continues down to become your neck. Next comes your thoracic spine (T1-12). Each thoracic vertebrae connects with a rib on either side at the transverse processes of the vertebrae (the little arms that stick out to the side). Next comes your lumbar spine (L1-L5). These vertebrae are larger and they make up your lower back. They connect to your sacrum, which is 5 fused vertebrae that lie in between your two pelvic halves and look kind of like a cupped hand or curved triangle. Your coccyx, or tailbone, is at the bottom.

Stay tuned for more info on individual vertebra and some #moveit posts to get your spine going!

http://en.wikipedia.org/wiki/Human_vertebral_column

http://en.wikipedia.org/wiki/Human_vertebral_column

Diastasis in Men and Women

Diastasis is the separation of your rectus abdominis due to stretching of the connective tissue, the linea alba, which seams the two halves together. Diastasis can occur in men, women and babies. It is most commonly associated with postpartum women. It can also be caused by obesity, history of vigorously straining the muscles, pregnancy or pressure on the connective tissue. In diastasis, the linea alba stretches out and ends up supporting the weight of your organs and contents of your torso rather than your abdominal muscles. 

What does it look like?

Diastasis is a ridge that may appear anywhere along the midline from sternum to pubic bone. It may pop up when the abdominals are engage -- especially in flexion -- and disappear when the abdominals are relaxed. 

Diastasis is present on the left and not on the right. 

Diastasis is present on the left and not on the right. 

We asked Physical Therapist Nadia Chopra, PT, DPT, COMT, OCS, for some more answers on diastasis. 

What should you do if you think you have a diastasis?

If you think you have a diastasis, the best thing to do is to go to your health care provider so they can confirm that you do or do not have one and send you to the appropriate person to address the issue.

How do you test for diastasis and what kind of information comes from the test?  

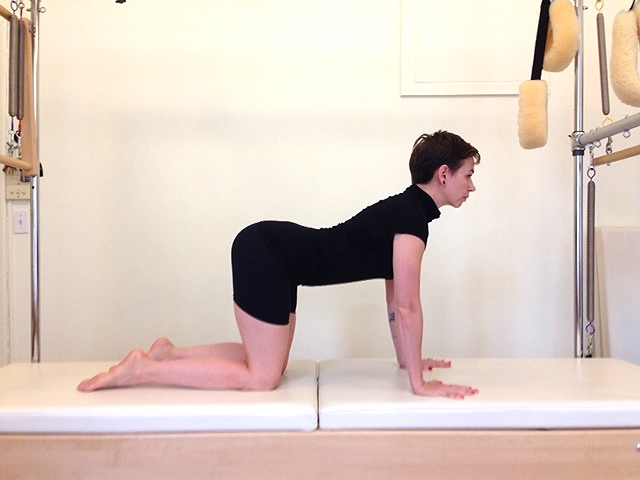
I have the client laying down on their back with their knees bent. The client is then instructed to lift head and shoulders off the table with arms extended, reaching towards their knees until the superior aspect of the scapula comes off the table. Then I measure with a measuring tape the width of the diastasis. This measurement is taken at 3 levels: at the belly button, 4.5cm above and 4.5cm below. The test is positive if the client has greater than 4.5cm separation, indicating  that a diastasis rectus abdominis is present . This test is great because we can use it to measure progress as the diastasis closes. I also use it to teach my clients how to feel the diastasis, and then they always feel the diastasis while performing their exercises to make sure it is closing as they are doing the exercise.

What are long term complications of diastasis?

Long term complications can range from low back pain, pelvic girdle pain, Sacroiliac (SI) Joint dysfunction, or even pubic symphasis dysfunction.

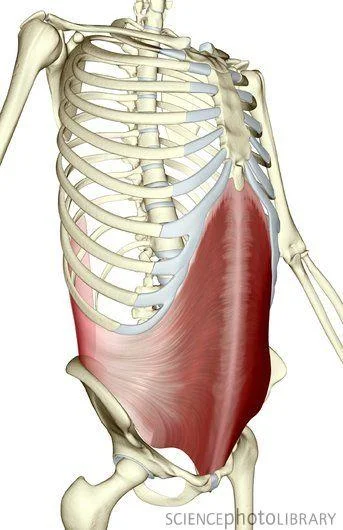
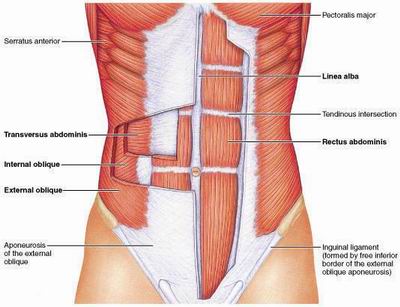
Why does pulling the abdominals in help correct diastasis?

Contracting SPECIFICALLY the transverse abdominals literally draws together the muscles. When the transverse abdominals contract, they tighten the thoracolumbar fascia (connective tissue going from the abdomen to the back of pelvis), which provides stability to the SI Joint, pelvis, and lumbar spine. It is necessary for every joint to have the appropriate amount of compression (not too much, and not too little) to stabilize the lumbo-pelvic girdle.

How long does it take to heal?

Honestly, it depends with each person. It varies based on the degree of the separation, how long they have had a separation, if they have other or multiple injuries/problems in the lumbo-pelvic girdle, and how compliant they are with the home exercise program.

What is the splint or belly band? 

Think of an abdominal splint as a corset. It literally helps to provide external stability via compression to your lumbo-pelvic girdle. Should one be worn all the time if you have a diastasis? No. Your health care provider can help you to determine what binder is right for you, how to wear it, and when to wear based on your individual symptoms.  

We asked Nadia what else comes to mind that is important to know, that we haven't asked?  She replied with the following common questions. 

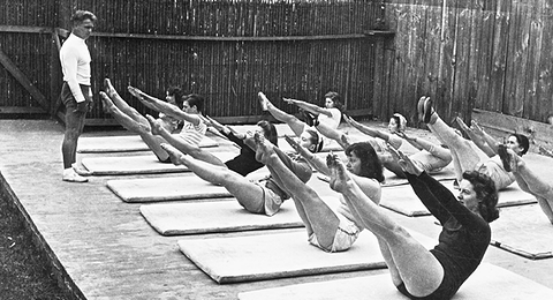
Why can't I just do crunches to help this problem?  

If you work the wrong the muscles, specifically the rectus abdominals, that can actually make your diastasis worse. That is why it is crucial to get an educated health care professional (PT, Pilates instructor,etc) to help develop a home exercise program for you and make sure you are doing the exercises properly.

If I have had a diastasis for 10 years, can it be fixed?  

YES!!!

Are all diastasis able to be fixed with exercise?

Unfortunately the answer to this one is no. Generally a doctor will recommend PT, but sometimes, this can not fix the problem 100% and the person will have to have surgery to correct the separation.  

A is for Abdominal

Shorty Swan here to introduce all your abdominal muscles! 

Let's work from the outside in or the most superficial muscles to the deepest. 


Rectus Abdominus- Your 6 pack. 

"Rectus abdominis". Licensed under Creative Commons Attribution-Share Alike 3.0 via Wikimedia Commons http://commons.wikimedia.org/wiki/File:Rectus_abdomin is.png#mediaviewer/File:Rectus_abdominis.png

"Rectus abdominis". Licensed under Creative Commons Attribution-Share Alike 3.0 via Wikimedia Commons http://commons.wikimedia.org/wiki/File:Rectus_abdomin is.png#mediaviewer/File:Rectus_abdominis.png

The Rectus Abdominis start at your pubic symphysis and pubic crest, attaches to the cartilage of the 5th, 6th and 7th ribs and xiphoid process. It's two halves are connected by a band of thick connective tissue called the linea alba. More tendinous intersections transverse across each strip of vertically running muscle fibers, creating the segments of the sought-after six pack. It is your most superficial abdominal muscle. 

What does it do?

The rectus causes flexion of the trunk by pulling your sternum and your pubic bone forward toward one another. It also aids in forceful respiration. In the studio you use it for your C curve, chest curl and pelvic tuck -- just to name a few!

External Obliques and Internal Obliques

The External Obliques are the next layer below the rectus, while still being the most superficial muscle of the side body. The external obliques start along the outer surfaces of the lower 8 ribs where they interlace with the serratus anterior. They run on a diagonal, forward and in, towards the midline of your body, where they insert at the pubis, anterior (front) iliac crest, ilioinguinal ligament and linea alba. The fibers of external obliques run in the same diagonal direction. The muscle fibers run in the direction your fingers point when you place your hands like you were preparing to reach into your pants pockets. 

What do they do?

When both the right and left external oblique flex at the same time or bilaterally they flex the trunk, bringing your rib cage towards your pelvis when you hold your pelvis still or vice versus. When one side is working on its own, it cause either side bending or rotation of the trunk towards the opposite side. For example, your right external oblique side bends you to the right and turns you to the left. If you visualize the direction of the muscle fibers, this makes perfect sense. In the studio you use these in criss cross, mermaid, saw, snake and twist and global stabilization of the spine. 

The internal obliques are underneath or deep to the external obliques and they run in the opposite diagonal. These deep abdominals originate at the inguinal ligament, anterior iliac crest and deep layer of fascia in the low back called the lumbodorsal fascia. (Think lumbo like lumbar spine and dorsal means backside). From there they run up and in to insert at low ribs 9 through 12. The internal oblique fibers directionally make an X with the external oblique fibers. If you cross your arms over your torso and let your fingers land at the top of your iliac crests, the internal oblique fibers run in the same direction as your fingers. 

What do they do? 

When flexed bilaterally the internal obliques compress your abdominal contents and help flex your torso forward. When flexed unilaterally, they facilitate side bending and rotation to the same side of the trunk. For example if you side bend to the left you are using both your internal and external obliques on the left side. If you rotate your rib cage to the left (but leave your pelvis facing forward) you engage your internal obliques on the left and your external obliques on the right. 

Transverse Abdominus - Your functional corset.

This is the deepest layer of your abdominals, closest to your organs and your center line. The fibers of the transverse abdominis run crosswise like a belt around your torso. Understanding the direction of the fibers helps us visual where it attaches, all around the bones of our center not just in the front. The transverse originates from the inguinal ligament, along the iliac crests in the front body and wraps around, anchoring in the back to the same lumbodorsal fascia as the internal oblique, the lumbar vertebrae and the inside surface of the bottom seven ribs!! In these back attachments it interlaces with the diaphragm. So the origins are really covering a lot of surface from top to bottom in your torso! All these fibers belt around to attach into the linea alba, the same midline marker that splits your six pack!

What does it do?

When the transverse fires it tightens like a corset decreasing the circumference of the torso. This contraction causes compression of the contents of our abdominal cavity. In short, it pulls the belly in 360 degrees towards center. It also fires when you cough or laugh. The transverse, like all the abdominal muscles, helps to stabilize the spine 


Here is a great image that allows you to see each layer, but all the layers in relation to each other. 

These abdominal muscles partner with the musculature of your back, pelvis, your pelvic floor and your diaphragm to encapsulate your organs. All together they are your core, your powerhouse, your center! We identify them separately, like identifying the members of a band, but they work in concert with each other. They are a functional family of support and strength for your body. 

Check out Explore Your Core for movements to activate all of these muscles. Or get outside and MOVE!

Explore your core

Below are a few examples you can practice to connect to your 5 Crucial Core Functions. Once you have a clear experience of how to tap into these functions and movements on their own, you can access them in your daily life (as well as sports and exercise) for a dynamic, fluid, healthy core. 

1. Lengthen

It's important to make space and length in your torso for the health of what's inside it and to support common goals like good posture, healthy spines and strong abdominals. Let's practice finding length through axial elongation. 

Take a comfortable seat with your legs supported. You should feel you can sit on the center of your sitz bones (or ishcial tuberosities) with the natural curves of your spine in tact. (If you are stuck in a rounded position in your lumbar spine or lower back try putting some extra padding under your pelvis like a folded blanket or yoga block). Now imagine the plumb line of your torso or a center axis that runs from the crown of your head to the center of your pelvis. Hold on to this sense of center while you work. 

Inhale and lengthen along your center line feeling the crown of your head reach towards the ceiling and the center of your pelvis reach towards the floor.

Exhale and draw your navel gently toward your spine to wrap around and support your length. Hold on to the length you have gained and add to it with your next inhale.

Repeat eight times growing longer and longer while increasing support with each breath. While your torso will elongate the neutral curvature of your spine should not change or shift. 

2. Scoop

Scooping and stability compliment each other. We will focus on the scoop here and stability a little later, but realize you are utilizing both. 

Knee folds -Lie on your back with your knees bent, feet flat on the mat, hip socket distance apart, and your spine in neutral. As you begin your exhale draw your abdominals in towards your plumb line and the up slightly. As you continue your exhale fold your right knee over your right hip without loosing your abdominal scoop and maintaining a long neutral spine. Inhale your right foot back to the floor. Repeat to the left with your next exhale.

Make sure to utilize the first and second half of your exhale to engage your abdominal stability and scoop. 

Make sure to utilize the first and second half of your exhale to engage your abdominal stability and scoop. 

Continue alternating right and left. Use your hands to help you listen to what your core is up to. Try a few with your hands resting on your abdomen. Feel your abdominals draw in and up. Notice if your ribs want to splay or compress.

Place this shape under your pelvis, framing your tailbone.

Place this shape under your pelvis, framing your tailbone.


Then try a few making a triangle with your thumbs and forefingers. Place your hands under your pelvis framing your tailbone with that triangle. (Your fingers should stick out below your glutes). Keep the weight of your pelvis centered in your hands by using your abdominal scoop and engaging your core. Notice if your pelvis wants to roll right or left, tuck under towards your thumbs or over arch towards your fingertips. 


3. All Planes Movements

Your core articulates your spine into flexion (rounding your back), extension (arching your back), side bending, and rotation. You will need to keep your plumb line in your mind's eye here too!

Flexion and Extension

Start on hands and knees with your hands right underneath your shoulders and your knees directly underneath your hips. Elongate your center axis in both directions with your spine in neutral. 

Flexion or Cat Spine. 

Flexion or Cat Spine. 


On an exhale, keep your arms straight as you round your head and tail towards the ground and you curl your waist band up towards the sky. This is spinal flexion. Draw your belly in and up, hugging your organs to your spine. 


Inhale and arch your head and tail towards the sky making an even arch from skull to sacrum. This is spinal extension.


Extension or Cow Spine.

Extension or Cow Spine.

Continue with your breath for several rounds. Notice which parts of your spine don't like to move at all and which parts like to move more than their share. Try to initiate both flexion and extension from a very active and supported center, moving evenly through your whole spine. Avoid sinking into you shoulders by maintaining width across your collar bones in both positions. Feeling really advanced? Do this while hovering your knees 1 inch off the ground, keeping your thighs still. 


Side-bending with one leg extended

Esidebendlft.jpg


Return to your neutral quadruped with a long center line. Keeping your center line long and stable, extend your right leg back and tuck your toes under as though you were doing a plank. Stand strong through your right leg and check that your rib cage and pelvis are square to the floor. Maintain your position from the waist down and side bend by arcing the top of your head to the left. Find a long connection from your right heel, along the right side seam of your body to the crown of your head. Keeping your hips stable, pass through center and exhale to side bend to the right. Repeat 3 more times with the right leg extended and then switch to do 4 rounds on the left.

Note: It can be tempting, or even go unnoticed, that your spine will sneak into a small twist, flexion or extension while you are side bending. Imagine your torso is stuck between two planes of glass (one above and one below) while you work and you don't want to touch either as you move. As in flexion and extension, stay active in your reach out through your long leg as well as elongating your center in both directions. (See six limbs for more on this idea.)


Rotation

Keep your knees even with one another.

Keep your knees even with one another.

For this exercise you need a yoga block. Lie on your back with your knees bent and spine in neutral. Bring your legs to table top position and place the yoga block long ways between your shins. Place your arms long beside you with your palms firmly connected to the ground and your collar bones wide. 

Inhale to rotate your pelvis to the right unit your knees are even with your right shoulder or about 30 degrees. Keep your knees even, so one does not appear shorter than the other, as you squeeze the block. Maintain length through both sitz bones and your pubic bone as you twist.

Exhale as you bring your legs back to center. Inhale your pelvis and legs 30 degrees to the left and exhale back to center. Repeat for 10 sets.

If you feel your abdominals uncontrollably bunch or cannot keep the connection between your palms, shoulders and the ground, try lessening the amount you are rotating. Length and neutral spine are just as important here too!


4. Slow it down

Momentum is a great way to cheat your core out of good ol' hard work. (Don't get me wrong- command of momentum also features your core in some of it's most powerful moments.) Slow down your movements so you can notice your patterns, your tendencies and the good work you are doing. Moving slowly allows you to perfect your form. Then, once you are clear and ready, add speed when it's appropriate to the movement or goal you are training. 

The 10 Count Roll Up

Eroll ups middle.jpg

We are using literal seconds to time this one. If you are a speed demon, grab your watch, with a second hand, and a buddy. Your goal is to take the entire 10 seconds to roll up and another 10 seconds to roll down. No accelerating, no decelerating, no chopping with your arms or legs -- just slow, strong control.

Lie flat on your back with your legs extending and your arms reaching up to the sky directly over your shoulders. Inhale to elongate your plumb line in preparation. Keep the length in your plumb line as you exhale, nod and curl into your upper abdominal curl. Continue exhaling as you roll up through your spine to a seated position, bending your knees if you need. Keep your heels on the ground and your arms stable in front of your shoulders the whole way. Inhale in your seated position. Exhale as you roll back down, starting with your pelvis, rolling through your torso until you are long on the floor in your start position. It is helpful to count out loud!

5. Stabilize 

No movements. No micro movements. This means that all of the spinal movements you found above disappear. Let's practice stabilizing in neutral today but remember you want to also be able to stabilize in flexion and extension. 

Eforearmclose.jpg


For this exercise you will need a physio ball. Begin on your knees on a mat and place your elbows and forearms on top of the ball making a fist with your hands.

Step your feet and legs back into a plank position with your feet wider than hip distance. Hold your core still, elongating your center axis as you draw circles with your elbows 5 times in each direction. If this feels too hard and you cannot stabilize your spine, try the same thing with your knees down. If this feels too easy step your feet closer together. 

Draw small circles with your elbows keeping your spine totally still. Too hard? Put your knees down!

Draw small circles with your elbows keeping your spine totally still. Too hard? Put your knees down!

#corevalues is a series focused on the core and all of it's complexities. We encourage you to explore your core in and out of the studio!

Looking for more at home exercise tips? See Swan approved suggestions here!

Those Boney Pelvic Landmarks!

Shorty Swan is excited to share the boney landmarks of your pelvis with you! Often you are called on to organize these landmarks in a Pilates class. Understanding what they are and where they are in a spatial relationship to one another will help you develop stellar form and proprioception, not only in Pilates but in all movements.

Your pelvis is the basin for your organs comprised of four larger bones- your sacrum, coccyx and two hip bones. The pelvis acts as the bridge between the upper body and the lower body. The weight of the upper body is transferred through our pelvis to our legs for motion and all motion in the lower body reverberates up through the pelvis to your spine. How we organize our pelvis greatly affects full body movements. 

Hip points/ ASIS

Your hip points are often cued for lining up your pelvis. These boney landmarks are the anterior superior iliac spine or ASIS for short. They are an easily locatable surface on the Iliac crests of your or ridge of your ilia. Looking at the picture below of the front of the pelvis, the wing like bones (labeled 2) are your ilia (plural for ilium), the top edge of each ilium are your iliac crests and the most forward and widest point along the iliac crest is your ASIS. 

Your ASIS are cued in Pilates because they are easily felt on the front surface of the body or against the mat. If you place your hands on your natural waist, squeeze in a little bit and run them down your torso you will find your iliac crests. Then use your finger tips to trace the crests around and down towards the front of your body to find your hip points or ASIS. Your ASIS might be where your pants tend to sit and your iliac crest could be what you think of as your hips when actually we can see they are more complicated than that!

"Skeletpelvis-pubis" by Wiechers at Dutch Wikipedia 

"Skeletpelvis-pubis" by Wiechers at Dutch Wikipedia 

Sitz Bones / Ischial Tuberosities

In Pilates we like to know where our sitz bones are all the time. Are they long, tipped up, wide, reaching under? If you sit on a hard surface like a wooden chair or the floor and gently rock from right to left you will feel your sitz bones. It might be helpful to move your glute flesh out of the way a little bit. What we know in the studio as sitz bones are ishchial tuberosities. Tuberosity means a large prominence on a bone which usually serves as a site for muscular attachment. So your sitz bones are tuberosities on the ischium which is the bottom bone of the pelvic bowl (labeled 3). Your ischial tuberosities take the weight of the body when we sit. 

Pubic Bone/ Pubis

Your pubic bone is actually two bones called your pubic crests (Labeled 4) that are joined together with a fibrocartilage disc known as the pubic symphysis (labeled 5). While we tend to think of it as one, hard bone It can be helpful to visualize lining up both sides or halves of your pubic "bone" when squaring off your pelvis. The pubic bones are cued so often because, like the ASIS, it is easily locatable on the front surface of the body or against the mat. These surface land marks allow for easier proprioception while you practice as reference points for your boney alignment.

Sacrum

The sacrum (1) contains five fused vertebrae and sits between the two ilia creating the posterior ring of the pelvic girdle. The sacrum is the keystone bridging the vertebral column to pelvic girdle transferring the body weight to the legs. The sacrum and the lumbar spine meet at the junction of L5 and S1.  The sacrum meets the top of each ilia at the sacroiliac joints. The sacroiliac joints are broad, flat, synovial joints that were once believe to not move. While SI joints can lose mobility as we age, they remain mobile when healthy. As in any joint, hyper mobility is often problematic. A network of sensory and movement nerves for the lower body run through the sacral plexus, running through the holes in the bone. 

Image from Greys

Image from Greys

Tail Bone / Coccyx

Your tail bone or coccyx is attached at the end of your sacrum at S5 and contains three to five fixed vertebrae. The coccyx serves for muscular attachments, is truly the tail end of your spine and is slightly above and behind your sitz bones. 

Related boney landmarks in your femurs (aka thigh bones) are the lesser trochanter and the greater trochanter. More on those when we talk about the hip joint but here is an image for you to run with until then!


5 Crucial Core Functions

This month we are exploring the core! You will need a strong knowledge of your center to use it wisely as you launch, center first, into the Fall. #Corevalues will investigate what your core does, boney landmarks of the pelvis, all your abdominal muscles, dysfunction in the core and more!

Let's start with some essential core functions. By now you know your core is waaaaay more than your six pack. Here are five crucial core functions that everyone's core should have full command of -- does yours? 

1. Equal parts stretch and strength. If all of your abdominal exercises shorten and compress the front of your torso you will end up with a bunched waist band. Length counts! Understand how to lengthen your torso in stellar alignment no matter whether you are kneeling, standing, sitting or moving. It's like any kind of learning - the way you exercise (teach) your muscles is the way they will learn to work. Who doesn't want to feel a little longer? 

2. In Pilates we work the scoop. It's not the clench, bunch or the shorten, it's the scoop (and it's not a tuck)! The scoop means dynamically supportive abdominals. Engaging your core should make you feel longer through the center line of your torso, not clench you into a ball or make you too stiff to move. Practice sitting long through your spine and draw your abs in and slightly up without flattening your back or bucking your ribs. Use your exhale! Now do that 10 times and hold for 10 seconds each!

3. All directions. A healthy spine and core can move forward and back, side bend, twist and extend. There are reasons to avoid some of these movements, but if you don't have an injury the best way to prevent one is to keep all these movements alive, working and clearly understood. Try cat/cow, saw, thread the needle, swan or just rolling up and down from standing. Don't know these exercises? Maybe you need to get to class :)

Check out this archival video of Joe moving his super healthy spine in all planes on the spine corrector! 

4. Slow your roll. Blazing through your abs series usually means momentum is doing work your core should be doing. You might feel your hip flexors and neck work more than anything else. Try lying on the floor with your feet standing against the wall and do a couple abdominal curls while keeping your pelvis long without gripping in your hips. (Ready for more? Try these). Slide back on the floor and put your feet against the floorboard for stability and practice a few slow roll ups and roll downs and articulate through every part of your spine using your length and full breaths. After a few of these exercises in a clear, concentrated fashion, you should start to understand how to work your abdominals without gripping everywhere else. No more bouncing off the physio ball for you!  

5. Stabilize! Working your core can mean just keeping it still! A functional core stabilizes the spine in a healthy, long, neutral position. Each spine needs it's own special recipe to be organized into supported length. Every core has the capability of doing so! Stand on your hands and knees and find length through your spine. Find your scoop without flattening. Extend your right leg back, left arm forward and feel how just staying balanced can become an abdominal exercise. Alternate sides a few times. Use your breath and find your center stability.

Not a master of these five elements? Keep an eye on our #corevalues for some exercises to continue exploring them next week! Or hit the studio for extra TLC.

#corevalues

In Pilates the word "core" gets thrown around a thousand different ways. But as humans why is feeling connected, centered and balanced in this part of our body important? When your center is out of whack, weak or disconnected, it's like living in a house with a shaky foundation. 

Muscles by the amazing Ben Giles

Muscles by the amazing Ben Giles

core

noun

the earth's core: CENTERinteriormiddlenucleusrecessesbowelsdepthsinformal innardsliterary midst.

the core of the argument: HEARTheart of the matternucleusnubkernelmarrow, meant, essence, quintessence, crux, gist, pith, substance, basis, fundamentals; informal nitty-gritty, brass tacks, nuts and bolts.

adjective

the core issue: CENTRALkeybasicfundamentalprincipalprimarymainchief, crucial, vital, essential; informal number-one. ANTONYMS peripheral.