#moveit

STRETCH

Welcome to the stressful, too-many-parties, family-filled, end-of-year wrap up, glittering time of year. You know what you need to do? STRETCH! This series should take less than 20 minutes. Make sure to do the whole sequence in order for the full effect. Enjoy!

1. Breathe. Lie on your back and take a few full breaths. This stretches your insides and is an important first step to any stretching process.

2. Hamstring Stretch. Draw one knee into your chest and loop a strap (belt, long towel, scarf) around the sole of your foot. Extend your leg to the sky at an angle that allows you to keep an even pelvis and long spine. 1 minute each side.

3. Figure Four. Cross your right ankle over your left knee and bring your left leg to tabletop. Hold behind the back of your left leg and gently draw your legs towards your chest keeping your lower back long. You may like adding a gentle rock from side to side. 1 minute each side.

4. Quad Stretch. Lie on your belly with long legs. Make sure you line your self up in a straight line (not like a banana!). Bend one leg, bringing your heel towards your pelvis. Hold your ankle and direct your knee straight down. 1 min each side.

Hamstring Stretch

Hamstring Stretch

Figure Four

Figure Four

Quad Stretch

Quad Stretch

5. Hip Flexor Stretch. Stand vertically on your knees and step one foot forward into an upright lunge. Use your abdominals to lift your hip points and level your pelvis. Tuck your tail slightly and gently shift your aligned pelvis and spine forward into a stretch. 45 sec each side.

6. Straddle. Sit with your legs open to the sides like a large "V". If you cannot sit comfortably like this, sit up on a blanket or yoga blocks. Point your knees and toes up to the ceiling and have a very upright spine. If you are able, slowly tip your spine forward, hinging from your hips to move deeper into the stretch. 1 minute.

Hip Flexor Stretch

Hip Flexor Stretch

Straddle

Straddle

7. Chest. Stand clasping your hands behind your pelvis. Reach your knuckles down towards the ground as your open the center of your chest to the sky. 30 seconds, and then switch the way your fingers are crossed. Repeat!

8. Neck. Here is a link to a series of neck stretches we think are fabulous for relieving neck tension. Trust us.

9. Breathe. Yes, again :).

Short on Time Pilates Exercises from Swan Instructor Katie!

katie teaching.jpg


The breakneck pace of fall in the city (or anywhere) can make it difficult to get in to the studio, let alone keep up a healthy at-home practice. We asked Swan Instructor Katie about some of her go to exercises when she is feeling the rush!


There are so many great at home Pilates exercises, it's hard to know where to start! I personally try to work from the ground up when I can, but when I am short on time I have a few that I consistently rely on.


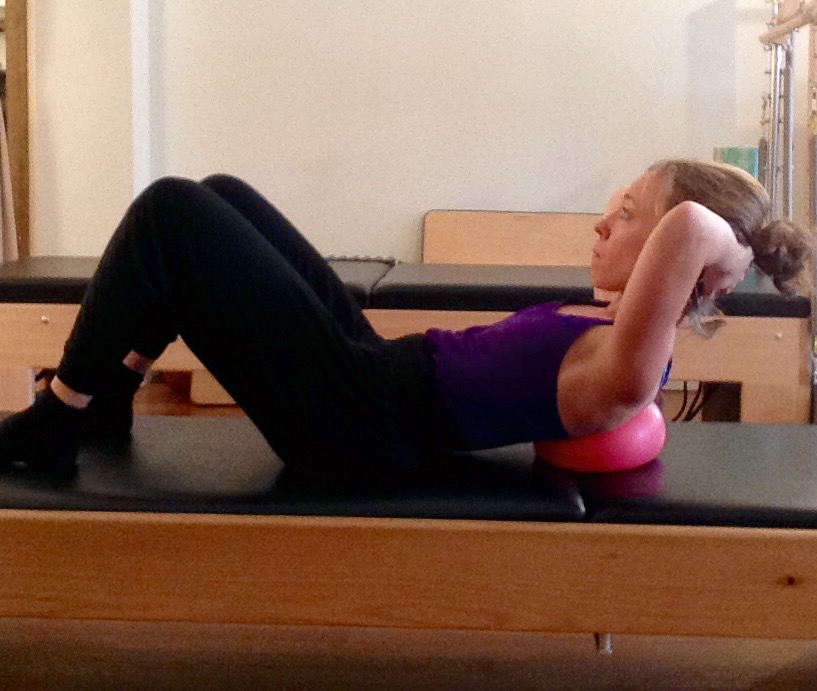
Chest Curls with Squishy Ball aka Over Ball (can be done with out the ball too) 
Lying on your back, knees bent, place a squishy ball under your bottom ribs. If you need support for your neck, you can place a block or pillow under your head (although not necessary). Place your hands behind your head and on an exhale nod your head into your chest and come into a chest curl. Lower back down. Keep your head heavy in your hands and move from the ribs. Repeat 8 times.

Add on these variations for additional core work:

Bring legs to table top, maintaining neutral pelvis. Keep legs in place and do 8 reps of chest curls. You can also add toe dips, doing 8 reps. Then add rotation in with the upper body, moving the ribs in to the ball, again doing 8 reps. 

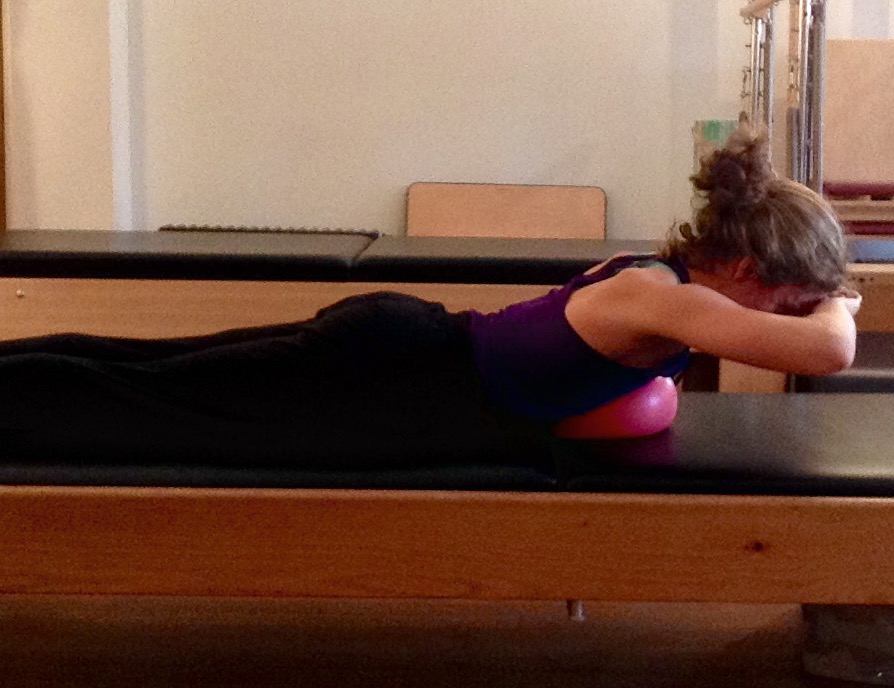
Extension
Flip over on to you stomach and place the ball under your diaphragm or where the ribs start to splay. Take a few full breaths, hands stacked under your forehead. Keeping the hands attached to your forehead, engage the abs and lengthen through the spine. Float the upper body up as if you were trying to draw the ball forward with your chest, coming in to a slight extension. Keep the back of the neck long throughout. Repeat 6 times.

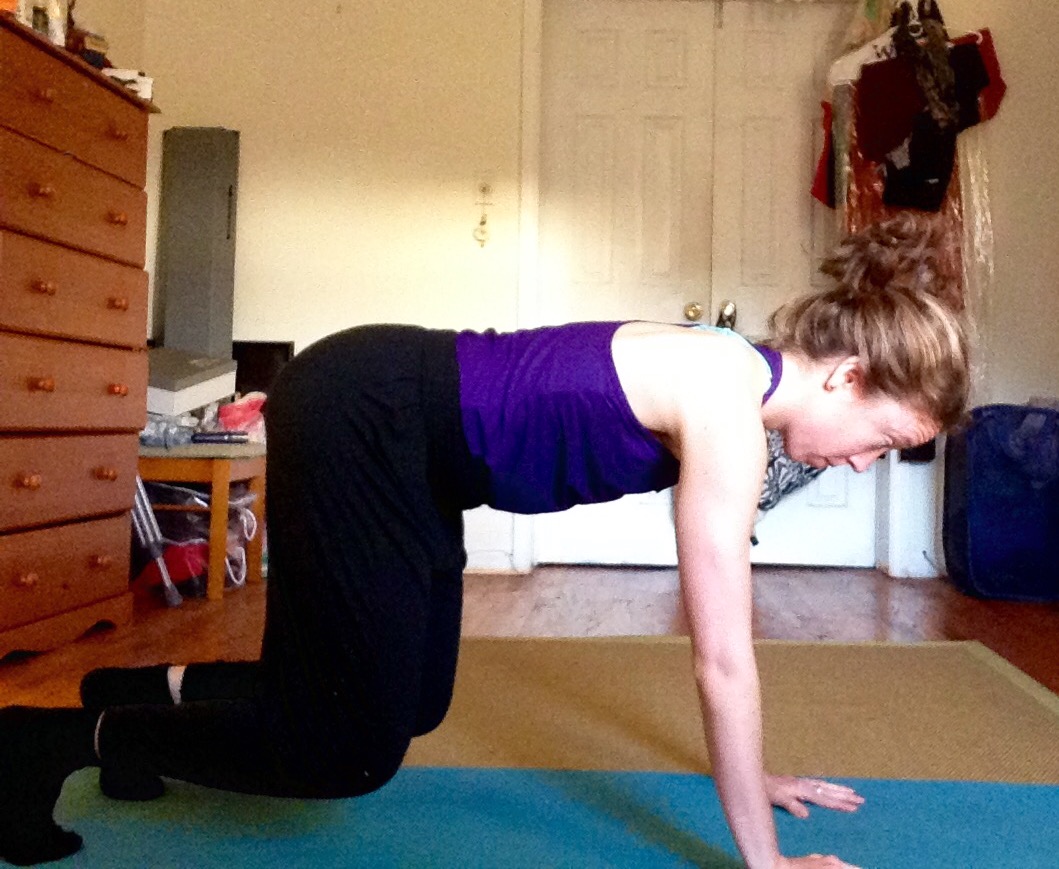
Knee Lift in Quadruped  
Come on to your hands and knees and find your neutral spine. Find width between the shoulder blades by pressing in to the palms, tuck your toes under and lift your knees an inch above the mat. Hold for 5 full breaths and lower. This can be done by adding serratus push ups (drawing shoulder blades towards each other and away, keeping arms long) as well. Repeat 8 times.

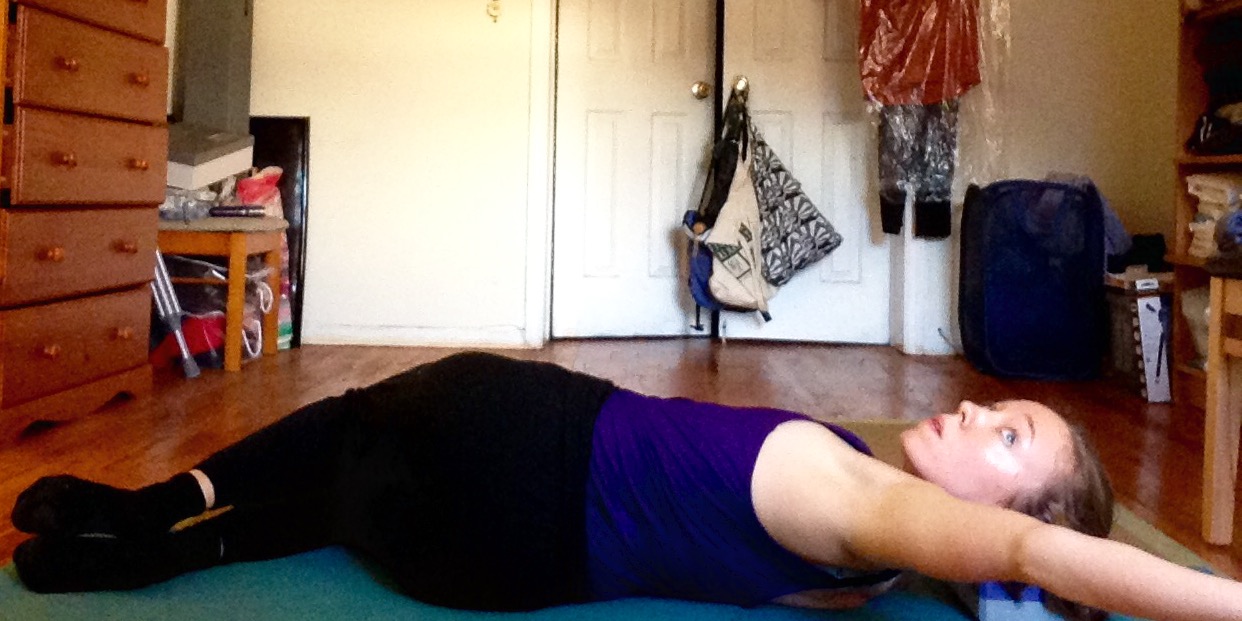
Glute Exercise with Rotation
I also love glute exercises, particularly this one as it incorporates rotation of the thoracic spine. Lying on your side, bend your knees and bring your heels in line with your sitzbones. Stretch your bottom arm out long in front of you, in line with your shoulder socket. Stack your top arm on top of your bottom arm and reach the top finger tips towards the wall in front of you, then up towards the ceiling. Pause and take a breath, then spiral open from the middle spine in to twist, keeping the hips stacked. Take a few full breaths in to the back and then reach the top arm back to meet the bottom. Now lift the top leg to hip height, foot in line with the knee and slightly rotate the knee open. Keep the leg in this position as you repeat the spiral of the upper body. Take a few breaths and then lower both arm and leg down. Repeat to the other side.    

Musings from your neighborhood Swan Instructors: Pt. 2

We love picking the brains of the instructors at the Swan. They are such a lovely bunch of deep thinking individuals. Check out what they have to say about the current state of their swan brains!

What is your favorite exercise? Why? And walk us through how you execute it?

Johanna: I love serratus push ups and all the exercises that one can feed into afterwards. Not strictly a Pilates exercise but one that can make a lot of the upper body flexion exercises like 100s feel so much better on the neck. The way Eleanor and Julia give details on the serratus push up and me very fond of this exercise and I like to incorporate in most sessions and classes. I love warming up the shoulder girdle and getting the serratus a little more activate as a great support in other exercises.

I tell clients to go onto their hands and knees allowing their ribs to glide down towards the floor and push away without hyperextending their elbows. Floating their ribs above I cue clients to find an “alert spine” spine like an animal. I find it profound when clients energize their whole trunks. I also cue them to think of doing a headstand on the wall as if they could do a horizontal head stand, to find energy through the rest of their body.

From here I have clients go into standard opposite arm leg balance and then into a plank to maintain that rib cage lift or float off their wrists. Then I go into abdominals lying on your back with hands behind the head, maintaining the connection of shoulders blades as you fold forward from the lowest ribs. I like to think of the shoulder blades as hands helping to widen the back and help support the spinal flexion.

Kathryn: I have no honest answer. Ninety percent of the movement I encourage with students are progressive variations on the classic choreography. The principles applied hold much more worth for me. So that being said, stability vs mobility is one of my favorite fundamentals in Pilates.

1439824398733.png

Alexis: My favorite exercise right now is simple... Side-lying grapefruit-sized leg circles. Side-lying gives a lot of information about howe we are organizing ourselves and the circles help plug in the femur bones using the natural structure of the hip joint. The whole thing quickly helps me (and you) re-find length and support for standing!

To begin, I grab a block and place it under my head while lying on my side of choice. Bottom leg bent to 90 and top leg long in line with top sitting bone. 

I first start with a couple breaths, allowing the inhale to elongate my spine. Each new breath cycle. I work closer to the back line of my diaphragm while keeping engagement with the lower abdominals. 

After a few breaths I wrap my top hand around the top half of my pelvic structure - it's a good reminder for my body of pelvic motion vs. femur motion.

Before moving into circular motions of the femur I do a couple of straight leg lifts up and down. I'll go as high as I can while keeping the pelvis stable. It's usually no higher than my hip. I am careful to keep my leg right in line with my body (not in front or behind!)

Finally, I will hold my top leg about hip height and double-check in with my spinal length (did it compress?), breath (is it still easily exchanging with the motion?), top hip crest (did it shift into my waist-line?)... I'm ready to circle the femur. 

I start making grapefruit-sized circles and usually go until I start to feel a little fatigue, and then reverse. If my quad starts to grip or I can no longer keep movement out of my pelvis then I will take a rest before finishing. 

KEY!! The length of the leg away from the head is more important than the size of the circle. Feeling some burning? It is a sneaky exercise - you're doing it right!

Alaina: The Roll Over. I had such a hard time with that exercise, so now that I have the tools to conquer it I feel a sense of accomplishment each time I do it. Lying supine legs extended on a 45 degree angle and arms on the mat by you side. On an exhale lift the legs up and over, bringing the legs parallel to the floor. Open the legs, tap your toes to the floor and slowly roll down to the pelvis, circle the legs around to the starting position.

Katie: I have a lot of favorite exercises that shift depending on what I'm focusing on- I tend to gravitate towards simple yet effective and challenging exercises. Right now, my favorite glute exercise is one that I learned in Kathryn's class (a fellow swan).

Lying on your side with the head supported, take a theraband around the top foot and wrap under the bottom knee, holding both ends in the top hand. Legs are stacked like you're sitting in a sideways chair. Lift the top leg to hip height and then extend top leg straight beneath you and bend back in 6x, maintaining neutral pelvis. Then externally rotate the top leg and bend and straighten 6x maintaining the turned out position. I feel it every time!

Eleanor: My current favorite exercise is butterfly knees. This is mainly a stability exercise that takes a lot of brain power and deep core stability to perform well. I like this exercise because it helps balance the pelvis, gets the TVA, multifidi and pelvic floor ready for more complicated exercises to come. 

Place your legs and feet together. With a really long and supported pelvis position, allow your knees to fall away from center without disrupting your pelvic and lumbar suppport. You will be rolling onto the outsides of your feet. Keeping your length, bring your inner thighs back together. Repeat a few times to feel really stable. Once you feel stable, alternate opening one leg at a time, moving only in a range of motion where you can truly maintain your pelvic and lumbar stability. If you have a side that feels more challenging, you may do a few extra on that side - really try to make yourself feel even by the end of the exercise.

Expanded glute #moveit

Hi Swans! Here is a series that puts together more full body movements to get your #gloriousglutes going. If you have missed this series, look back to brush up on your gluteal anatomy, check out some #articlesofinterest and read a thing or two Travis had to say. We also suggest thinking about your #hammies and #gloriousglutes at the same time, feeling how they work together to fire up the back chain of your legs!

bridging with pulses - Remember the bridge party from the hamstring series? We can kick the bridge up a notch. Pulse it! Think of staying long through your back (as it often likes to over-work) and stay VERY even through your hips. While pulsing can you open more space in the front of your hips? Even more challenge? Try marching side to side (floating one leg to table top and then the other). Stand on one leg and take tiny pulses on one leg! Switch sides. 

swimming legs with circles- Set yourself up like you did for swimming in the hamstring series. After swimming side to side a few times, hold your right leg up and externally rotate the leg. Maintaining this rotation, make small circles of your whole LONG leg in one direction, then the other direction. Repeat on both sides. Think of moving from the very top of your hamstrings and bottom of your Glutes!

squats - Standing with your feet about shoulder width and in comfortable rotation, bend your knees, sending your hips behind you. Your back stays long and you may either reach your arms forward or hold them behind your head. Stand up and make sure to bring your hips right above your feet. Always make sure your knees align over the centers of your feet, use your core to support your spine and BREATHE!

split stance squats - Stand with one leg forward and the other leg back, back heel against the wall. Be as square and upright through your torso as you can. Bend both knees and focus on creasing in your front hip. To stand up, put your attention on the glutes of your front leg to power the movement. Both legs will be working but try to focus more on the front leg. Repeat on both sides. Practice stellar support through your torso and alignment of your legs. 

step ups/going up front - Place one foot on a step, the curb, or a box of an appropriate height. Stand all of the way up on this leg and take a moment to feel balanced and engaged through your standing leg. Step back. Repeat on this side 6-10 times and then switch sides.

The Kiley- a beach house program!

The Kiley


I wrote the original version of this program for a very lovely client, Kiley Durham. Kiley inspires me every time she comes in the studio. Last year, as she was preparing to be away for the month of August, we decided she needed a travel program -- with a squishy ball of course! The overball is super portable making it your perfect Pilates travel companion. Pack yours and channel Kiley's drive to keep your practice consistent while you are enjoying summer!

**We have included some of Kiley's favorite beach tunes so you can really get in the mood and mind set. Her picks were inspired by time spent with her son!

1. Arch and Curl 

Place the 1/2 way deflated ball under your pelvis. Knees bent, feet on the mat. (In parallel!)

Inhale and arch your lower back sending your tail bone towards the floor. Exhale and curl tucking your tail towards the ceiling and lowering your waist towards the floor. 

Remember to give the weight of your pelvis to the ball the whole time and do most of the work from your deep abdominals.

Keep your ribcage and throat relaxed moving efficiently and only engaging where you need to.

8-10 sets

3.Knee reaches

Keep the ball under your pelvis. Reach your right knee past your left, with your pelvis resting on the ball. Think of lengthening the right side of your pelvis and lower back. Keep your hip points level. 

Return to center and repeat on the left. 

10 times

5. Hip flexor stretch on the ball

Keep the ball under your pelvis and extend your right leg on the mat. Hug your left knee into your chest and relax your ribs. Allow your right hip to open for three breaths.

Repeat on the left.

7. Marching Bridge

Remove the ball from your knees and set it close by. 

Roll up into your bridge. 

Exhale and shift all your standing weight into your right foot. Keep your hips level as you float your left foot off the mat three inches. 

Inhale your left foot back to the mat.

Exhale and repeat on the left. 

Remember to keep your hips level and lower back long. Top of your hamstrings and your gluts should be working. Take your time to stay centered.

10 sets

9. Obliques using the wall.

Lie down with your legs extended and feet flat against the wall. Find a strong reach down into all surfaces of your feet while lifting up with your abdominals. Hands are interlaced around the back of your head. 

Come up into a low chest curl. Side bend to the right. Pass through center. Side bend to the left. Return to center. Lower your head. Repeat 10 sets alternating which side you bend to first. Keep your feet connected to the wall no matter where you are in the movement.

11. Leg lifts and curls with the ball

Time for your favorite!

Continue to lie on your abs. Place the ball between your ankles. Make a pillow for your forehead with your hands. 

Reach back through your tail bone and draw your low belly wide across your hip points and away from the mat. 

Squeeze the ball and lengthen your legs back as you lift your thighs off the mat using your hamstrings and gluts. Keep lengthening as you lower. 

Check in with your upper body and make sure it's not bracing away from the mat.

Repeat 12 times with straight legs. 

Add your hamstring curl for the next 12.

In the same position lift your legs and ball. Keep your thighs hovering as you curl your heels to your seat. Track your knees in parallel and maintain length through the front of your hips so they are connected to the mat.

13. Plank with the ball between your thighs

Come up to hands and knees. Place the ball between your thighs. Hands under your shoulders and toes flexed under. Exhale up into a strong plank position, mindful of any elbow hyperextension and wrapping your shoulder blades flush onto your back with your serratus

Hold for three breaths. Repeat 3 times.

You can alternate this with a quadruped knee hover with the ball between your knees.


2. Pelvic Clock

Keep the ball under your pelvis and connect all four points from above. Tuck under, roll to your right hip point, roll to your arch with tail bone reaching towards the floor, roll to your left hip bone and back to your navel. 

Make 3-6 circles in each direction. Strive for round smooth circles and take time to reach in to stuck places along the way.

4. Knee Folds

Keep the ball under your pelvis, arms long beside you, hands on the mat. 

Inhale to prepare and lengthen, exhale and fold your right knee over your right hip keeping your hip flexor soft. 

Inhale your right foot back to the mat.

Exhale your left knee over your hip. 

Inhale back to the mat.

Continue to march staying centered and neutral through your torso imagining your thighs sinking deep into the sockets.

10 sets

6.Bridging

Place the ball between your knees. Knees bent, feet in parallel. 

Exhale squeeze the ball gently and inner spiral your thighs. Lift up into your bridge keeping your mid back relaxed and your hips long. 

Inhale and roll back to the mat.

Repeat 10 times

8. Chest Curls

Place the ball behind your back underneath your shoulder blades. Knees bent, feet on the mat in parallel. Hands go behind your head. Wrap your shoulders and elbow points to prepare.

Inhale and feel your bottom ribs open up.

Exhale and fold your bottom ribs to curl up in to your chest curl. Send your elbow points to the ceiling.

Throat and hip flexors are soft.

Inhale arch back over the ball.

10-15 times. Working evenly on both sides of your waist.

10. Swan with the ball.

Flip onto your abdominals and place the ball under your sternum. You may like to let more air out of the ball for this. Hands go under your shoulders on the mat, forehead resting on the mat. Legs are together, connected at the heels.

Inhale and arch up into your swan thinking of nudging your ball forward with your sternum. Exhale and relax back over the ball. 

Maintain a strong reach back through your legs and a lift in your low belly.

10 times

12. Side lying leg lifts with ball

Flip onto your right side with the ball between your ankles. Place your left hand on the mat in front of your waist. Set your head and neck up to be supported and aligned. Line your head, ribs, pelvis and heels up. You can do this against the wall to feel those structures in place. :) Check to make sure the underneath side of your waist is lifted away from the floor, obliques engaged.

Exhale squeeze the ball and lift both legs off the mat. Inhale and lower. Maintain your stacked alignment head to heels the whole time as well as the space between your waist and the mat.

10 on each side.

Happy Summer length, love, center and balance!

Keeping it high and tight! (Or How to get your Butt to work for you!)

Guest post by Swan Instructor Travis Steele Sisk

Since the release of Sir Mix-a-lot's "Baby Got Back" in 1992 we have all desired a better derriere. At least I know I have. Whether your reasoning is simply aesthetics or actually gaining strength to perform Olympic dead lifts with ease and without injury, an understanding of how well your Glutes are firing (or not) is required to get the most out of your butt workout.

In my journey through physical fitness, actually feeling my Gluteus Maximus firing in any exercise has always been a challenge for me. My quadriceps and hamstrings always seemed to take the grunt of the work whenever I tried to do squats or bridging. My work as a Pilates instructor has lead me to see similar muscle firing patterns in my clients. After doing some research on myself physically and by reading various articles in sport medicine journals, I have finally found what works for me in getting my Gluteus Maximus firing so that I'm actually sore the next day from performing squats. This information has allowed me to help my clients find the same burn when trying to get that butt working!

Through this series of exercises you should be able to reach a point where you feel your Gluteus Maximus firing during a deep well aligned squat (and if not during the exercise hopefully the next day)!


The first step is self myofascial release of the I.T. Band, Calves, and Glutes.

Start off sitting on the foam roller with one leg extended and the opposite ankle crossed over the knee of the extended leg. Bend the knee of the extended leg and proceed to roll the butt cheek of the crossed leg side to side on the foam roller for 30 seconds, then repeat on the opposite side. Next is the I.T. Band! You do this by turning onto your side on top of the foam roller, bending the knee of the top leg and planting that foot on the ground in front of the leg extended on the foam roller (see image below). Proceed to roll from just below Greater Trochanter (boney region on the side of your hip) to right above the knee. NEVER over the knee joint!

Last bit of foam roller work is your Soleus (or calves). Have a seat on the ground with your legs extended in front of you, place the foam roller under one calf and cross the opposite leg over at the ankles. Lift your body weight off the ground with your hands. Proceed to roll from right below the knee joint to above the ankle. Repeat on other leg.

Now that your fascial structure is loosened up. It's time to do some work.

I suggest starting with single leg circles.

Laying on your back, raise one leg up in the air keeping it as straight as you can while reaching for the ceiling. Keep the other leg extended down on the floor while you draw basket ball sized circles in the air with the big toe of the leg extended towards the ceiling, making sure the circle crosses the mid-line of your body. Draw 8 circles in one direction and then reverse with 8 circles in the opposite direction. Use your breathe and make sure to engage your abdominals as you exhale. Repeat with the other leg, 8 circles in each direction.

Next you want to get the Gluteus Medius firing, as this will help keep your knees tractioning over your toes when your move through your squat.

The best way I have found to accomplish this is through the Side Leg series.

A great starting point is Side Laying Leg Lifts (which was outlined previously here). Instead of switching from one side to the other immediately, stay on the first side and add on Clam after your Leg Lifts. To execute Clam, bend your knees slightly from their extended position and lift both feet off the floor. Be careful as you do this to not collapse or rest your low ribs to the floor. You are trying to mimic standing throughout this series and ideally you wouldn't be standing with your ribs shifted to one side but rather with them floating in alignment over your pelvis. Now with the feet lifted and the femur of your bottom leg resting on the floor proceed to open your top leg, knee leading towards the ceiling, stopping at your range of motion. Close and repeat for 10-12 reps. Following Clam, bend both legs into a 90º angle where your shins are parallel with the front edge of your mat. Lift the top leg hip height, keeping the space between your low ribs and the floor, internally rotate the femur so that the knees touch each other then externally rotate the femur so the heels touch each other and repeat for 10 reps.

Lastly, stay laying on your side with your legs in table top position and your top leg lifted hip height, extend your top leg out and away from you so that your knee crosses the shin of the bent leg that is resting on the floor. Allow the inside of the knee of your extended top leg to lower and touch the shin of your resting leg. Then immediately lift it to hip height and repeat for 10 reps. Flip over and repeat those 3 exercises laying on the other side.

Now it's time to get the Gluteus Maximus firing.

One of the best exercises to awaken the Glute Max was described in this #moveit. Once completed move into quadruped (all-fours) for some more extensive Glute Max work. Once in quadruped make sure that you engage the abdominals inward towards the spine with every exhale (without rounding the back). Extend the right leg out behind you keeping it parallel to the ground and extend through the heel. Pulse the extended leg toward the ceiling. With every pulse make sure you exhale and engage the abdominals. You only need to bring the leg high enough to feel the Glute Max fire. Do 10-12 reps with each leg.

The second exercise while on all fours is meant to get the Glute Max firing in multiple directions. Start by exhaling while bringing your right knee toward your right elbow, letting the knee tough the elbow, if flexibility allows, while keeping straight arms. Inhale while you send the right knee to cross over the calf of the left leg, touching the floor outside of the left leg. Then repeat exhaling the knee toward the right elbow and perform this for 10 reps each leg. So now your whole hip and Glute complex should be warmed up and prepped for Squatting, one of the most functional movements we as humans were created to perform. If you look at small children they have no problem squatting with their hips flexed below their knees. This is something we should also be able to do with ease while maintaining a well-aligned squat with keep your knees, hips, and lower back mobile and ready for action.

The mechanics of your squat go as follows:

-Make sure your feet are slightly wider than hip distance apart and placed in your natural turned out position (somewhere between parallel and a "Pilates first" position).
-Interlace your fingers behind your head and keep your elbows wide.
-As you start to descend lead with your tailbone as though you are going to have a seat on an imaginary chair behind you, and most importantly make sure your knees are tractioning over your toes at all times.
-Bring your pelvis parallel or below your knees (this may take a few reps before you are able to get so low) while keeping your head and back in a neutral position.
-On the way back up make sure your weight is in your heels and you are driving through them with most of your force.
-Lastly once upright give a squeeze of the butt to finish a strong firing of the Glutes
-Repeat 10-12 reps, 3 times through.

As always at the end of any workout, STRETCH! End with a figure four stretch, hamstring stretch and piegon (a stretch taken from yoga). Good luck on your journey for a better, more toned butt!

And as a side note, "Baby's got Back" makes an excellent soundtrack for keeping a good tempo while doing your squats. Sir Mix-a-Lot was onto something there... trust me.
 

Getting to Know Your Gluteus Medius! #moveit

For our #gloriousglutes #moveit series we are really breaking it down so that you understand the action of each glute muscle. Towards the end of the series, guest blogger and Swan Instructor Travis Sisk will offer a full glute home program. Take your time and use these exercises (as well as this one that targets your glute max) to gain a deeper understanding of the actions of each gluteus muscle on the joints they articulate. Better understanding leads to smarter movement!

Side lying leg lifts

This exercise is a Pilates classic within the side lying leg series. As we learned in Shorty's post about Gluteus Medius this muscle moves your thigh away from your center line in abduction. 

Lie down on one side with your head, ribs and pelvis all in one long line. Bend both knees into table top. Place a block or half roller under your head to keep your neck in alignment. Place your top hand in front of your waist for stability or on your top hip, or sacrum, to monitor what your pelvis is doing. Extend your top leg out long and bring it back in line with your top hip. Lower it to the mat and then lift it 1-2 inches higher than hip height. Lower it down to the mat keeping it  long under your hip. Repeat 12 times. Flip over and set up for the other side.  

Variation: Set up with your back against a wall. As you lower and lift your leg keep your heel in contact with the wall. This is great if you have quads that like to dominate. 

Wall balance with physio ball.

Stand with your physio ball between your greater trochanter and the wall.  Look down and get both feet truly under your hips. You will feel like the ball is shoving you away from the wall a bit. Square your ribs and hips off to the wall in front of you. Reaching tall through your torso, gently bend the knee of your leg that is touching the ball to lift that foot off the ground keeping your pelvis level. Balance here for 15-30 seconds. Repeat on the second side. Do three sets. Try this one with your shoes on or off! 

IMG_5510.JPG

Getting to Know Your Gluteus Maximus! #moveit

Here is a simple exercise that should teach you to feel your GLUTE MAX.

Lie face down and take time to connect into the length of your torso, and the support of your abdominals, while you breath into your back. Bend your right knee so that your heel reaches up to the ceiling. Turn your leg out slightly - the knee will open slightly away from center and the heel moves slightly towards center. Keeping a long spine, even hips and maintaining the rotation of your leg, lift your knee off of the ground. You should feel your GLUTE MAX engage to make this movement happen! Try both sides - you may have one side that likes to work more efficiently than the other!

glute max1.jpg

#hammies - MOVE THEM THANGS!

Here are a few exercises to kick your hamstrings into gear!

A great warm-up is Pelvic Bridging. Start lying on you back with bent knees, feet in line with your sits bone. Find a nice, long, connected torso. In one movement, lift your pelvis off of the floor, towards the ceiling. Find the four corners of your feet, length through your back and try to stand with the tops of your hamstrings, right beneath your gluteal fold. To come down, soften your chest and try to sequence down, one vertebra at a time. Repeat 4-10 times!

Need to kick it up a notch? Bridge on the ball! The ball adds a big ol' stability challenge and makes the rest of your body work harder. Here Julia demonstrates turned-out straight-leg bridging on the physio ball! Try parallel and turned out  for variety, but also pay attention to what feels best for your hips and back!


Challenge your pelvic stability with Swimming Legs (AKA Leg Pull Front). Lie face down with your legs extended long underneath you. Connect to your breathing, your abdominals, and find supported elongation in your torso. Without shifting your hips, reach long through your right leg until it is all the way straight and you can feel the top of your hamstring working. Lift the leg slightly off of the floor from the top of your hamstring, not allowing your pelvis and spine to respond to the movement. Alternate side to side.


Get a great concentric engagement with Hamstring Curls! Still lying face down with long legs, hold a ball in between your ankles. Maintain the length through your spine and the fronts of your hips as you bend your knees, bringing your heels closer to your sits bones. Bend only as far as you can keep your hips and back long. For an extra challenge, perform the same movement but hover your legs off of the floor the whole time! 4 - 10 repetitions.


You deserve a Hamstring Stretch. Lie on your back with your legs long underneath you. Feel long and even in your back and pelvis. Draw one knee into your chest and loop a strap around your heel pocket. Place your bottom leg in a position that allows you to keep length in your torso and pelvis as you extend your stretching leg. Breathe and allow your hip socket to feel deeper. Try crossing your leg across your center or externally rotating your leg like you are turning a door handle open to the side. 45 sec - 1 min each side!

Making Connections: Explore Your Core and The Spine

Recently, we have been exploring the #spine on the blog. Now it is time to put your new found knowledge to work!

Take a look at the gallery of exercise images from our #corevalues series #moveit and get the exercise details here. Your spine moves in 4 major ranges of motion- flexion, extension, twisting and side bending. This #moveit series takes you through all of these planes using your core to move your spine!

Swan props

If you have been to the Swan, chances are you have worked we props! We love them! Props help us understand where are bodies are in space and facilitate movement that might otherwise be elusive. They can also make exercises more challenging, provide variation or create space and release in your body. Here's a list of props now available at The Swan to beef up your at-home or travel practice. Try out these quick #moveit's to jump start your practice with props and come in to the studio for more ways to use these amazing tools!


Foam rollers - $25 + tax

We have full length high density Foam Rollers. These can be hard to travel with but make great at home props. 

#moveit Make some space in your chest. Lie down on the roller length wise with your head and tail supported. Keep your knees bent and  feet on the floor lined up with your hips. Notice which parts of your spine are touching the roller and which are not. Take your arms to cactus position- your elbows are bent at a 90 degree angle and out to the side in line with your shoulders. Let your arms and ribs get heavy and breath. 

pinkyball.JPG


Pinky Balls- $4 + tax

These balls make a great tool for opening up your feet, hips and mid back.  

#moveit Looking for some foot release? Try placing the pinky ball underneath what we sometimes refer to as your heel pocket. This is the nook on the bottom of your foot just at the back edge of your arch and the front of your heel. Allow your foot to drape over the ball in both directions. You are in charge of how much pressure to apply. 


Colors will vary. 

Colors will vary. 


Over Balls- $10 + tax

Over balls might your best travel buddy. They inflate and deflate with ease taking up no space in your bag or suitcase (or NYC apartment) and they provide endless variations! 

#moveit Chest curls. Halfway inflate your ball. Place it behind your back between the bottom tips of your shoulder blades. Your legs can be bent with feet on the floor or straight and together. Hands go around the back of your head. Tip your nose down to lengthen your neck and then curl your bottom ribs toward the center of the ball coming up into your chest curl. Keep long support in your abdominals and watch for over tucking or arching your low back. Do 12!

We carry the 6" posture ball. Need something a little bigger - it comes in 8" too, but is not currently in Swan stock.

We carry the 6" posture ball. Need something a little bigger - it comes in 8" too, but is not currently in Swan stock.


The Cantaloupe AKA The Posture Ball $20 + tax

Oh how we love the cantaloupe! There's just nothing else like it. 

#moveit Roll your gluts! Have a seat on this ball with just your right gluts. Roll from top to bottom- so from sitz bone to pelvic crest. Find something gnarly? Pause and breath. Try rolling from side to side a little. Avoid rolling over your hip joint on the outside. Come in for more ways to make space with this amazing tool!


Currently props are only for sale in the studio. Please contact us for more information or with questions.