#moveit

Office Pilates: FEET!

Got some aching feet from winter boots or harsh terrain? Check out this easy series to build strength, space and awareness in your feet and lower legs. If you have a pinky ball or tennis ball you will need them!

Want more? Check out all our posts about feet in #monthofthefoot or all our at home programs in  #moveit and all our videos in #swanvideo.

#necksupport: Engage and Lengthen!

Use these exercises to engage the muscles that support your head and neck. These exercises all focus on extension and length. If extension is contra indicated for you- book a session and we will help you find movements that suite your body. 


Diamond arms


Lie on your abdominals with your legs out long and reaching back. Place your forehead on a towel so you can breathe. Rest your arms in a diamond shape with elbows bent at 90 degrees and your fingers almost touching over your head. This is similar to the position you have to stand in when at the airport in a scanner. Take a moment to breathe into your back ribs and feel your collar bones wide. Keep your head and elbows on the floor. Rotate your upper arm so that your forearm and palm peel off the floor in one piece. Replace that arm on the floor. Repeat on the second side. Be careful not to rotate from the elbow down in an effort to get your palm off the floor. It's not how high you lift but where it comes from that matters here. The tops of your shoulders should stay soft and your midline should stay long. 


T arms

KHTtraps.jpg


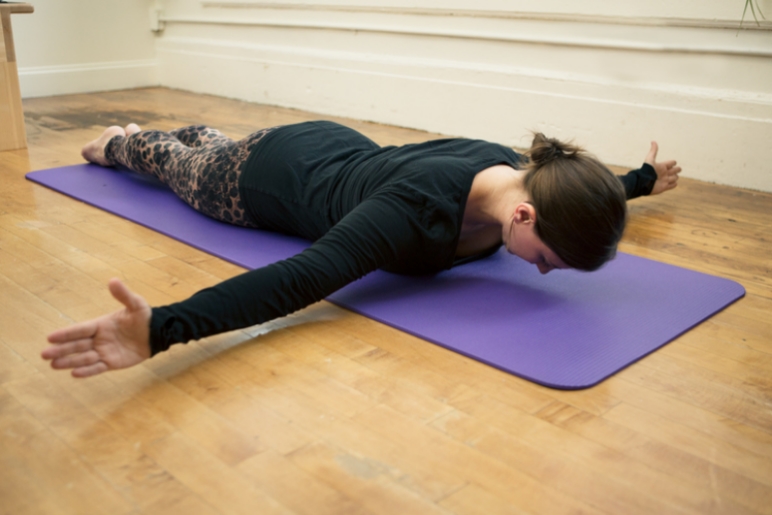
Lie on your abdominals with your legs long and reaching back. Rest your forehead on a folded towel so you can breathe. Reach your arms out into a T shape in line with your shoulders. Rotate your thumbs up toward the ceiling and your pinkys towards the floor. Curl your fingers into small fists so it looks like you are hitch hiking. Reach out through you arms and shoulders to increase your wing span. Imagine spinning your collar bones up toward the roof of your mouth. Keep this feeling of width as you float your arms out and up off the floor. Maintain the width as you lower back down. You want to feel the work low between your shoulder blades in your lower and mid traps, not in your upper traps. Your head stays on the floor the whole time. Repeat 10x only lifting as little or as much as you can keep the work targeted. 


Swan

swanj.jpg


Lie down on your abdominals with your legs long and reaching back. Place your hands underneath your forehead. Inhale to lengthen through your center line, floating your head up in line with the center of your rib cage. Exhale as you come into extension in your upper back. Think of opening through your front ribs, shifting the back of your heart forward and finding long support through your center and legs. Keep lengthening on the way back down. Try a few with your hands staying on the floor and then try a few keeping your hands connected to your forehead staying just as long even if you don't come up as high. 


For more chest opening and extension exercises check out this series from #expand

#necksupport: Release and Make Space.

Use these stretches to make some space in your neck and shoulders. Take your time, be gentle and breath. Not sure what your scalenes and legator scaps are? Click the links to learn more with our #necksupport series!

scalenestretch.jpg


scalene stretch

Find a comfortable seat or standing position in neutral spine with your feet and legs supported. Take your right hand and place it underneath your left collar bone, in line with your collar bone. Apply gentle pressure in towards your rib cage and down towards your hips using the entire length of your hand- no pokey fingers. You can stack your free hand on top for extra support if you like. Keeping your head over the center of your rib cage, side bend it away from your hands and left collar bone. Try not to jut your chin forward. Stay here for three breaths. Then gently rotate the broad edge of your left cheek and jaw towards the ceiling. Stay for three breaths. Release and repeat on the other side. 


levator scap stretch

Place one hand above your head with your elbow slightly bent. Tilt your head away from the arm that is up and rotate it to look down towards the ground. Breathe and try to allow your shoulder to release down your back. Repeat on both sides.


pec stretch

Face the wall and extend your arm straight out to the side.  Place your hand on the wall. Rotate your body away from your hand without rotating the head of your shoulder forward towards the wall or down towards the floor. Turn your head away. Try this with your arm a little bit higher than shoulder level. Repeat on both sides. 

If you want a dynamic pec stretch, try this one!


Swimmerstretch.jpg


Swimmers stretch

Sit or stand comfortably in your neutral spine. Bring your right arm up in front of your chest with your elbow bent to 90 degrees. Wrap your left elbow under your right and try to place your left fingers in your right palm. Your forearms will be intertwined and your palms facing each other. If the second step is unavailable, you can hold a strap between your hands or press the backs of your forearms and palms together. Keeping this arm posture, drop your shoulders down your back and lift your elbows. If you don't feel a stretch, move your hands away from your face without lifting your shoulders. Deepen your breath and direct it between your shoulder blades. (Optional: take a head roll in each direction) Stay here for a few deep, slow rounds of breath and repeat on the other side. 

Check out more at-home exercises with #moveit!

The Year in Review -- #moveit

As Swans we love to see you in the studio! It is so inspiring to see our clients growing their practice week to week. As much as we wish that we could see each and every one of you three times a week, every week of the year, life just does not always allow for that kind of consistency. Giving you the tools in the studio to take home with you is just as important to us. This year we created one of our favorite sections of the blog to help encourage and shape your at home practice. #moveit posts usually come at the end of one of our monthly series. Incorporating the information presented in a series into a specific set of exercise allows you to embody what you have just read on your computer screen. These #moveit posts can be used to enhance your at home practice or give you some new ideas and reminders about what we do at The Swan. These series are great to practice while away on vacation (if you already do this, bravo!). From your feet to your core to your wings, we have an exercise for you. Can't find an exercise series for a certain body part you are interested in learning more about? Let us know! Take a look at this photo gallery and #moveit today!


Noticing your Breath

Breath is the bridge which connects life to consciousness, which unites your body to your thoughts. Whenever your mind becomes scattered, use your breath as the means to take hold of your mind again- Thich Nhat Hanh

When we place our mind on our breath we inherently place our mind on movement within our body. Taking some time to practice noticing your breath can be valuable to your Pilates practice. What you notice about your breathing may hold a lot of information about patterns in your body and where they originate. Developing the ability to notice, follow and listen to your breath is a transferable skill within your movement practice. You can then apply that same calm attention to other movements, patterns or locations in your body. Just working on noticing when we are not moving gives your mind time and space to develop endurance and clarity of focus. 

The breath is special though. It is constant. It is anchoring. Breathing influences and is influenced by our emotions. Being with your breath without judgement can lead to being with those movements with openness and simply noticing what comes up as we travel through our Pilates practice. 

Just Breathe by Travis Bedel

Just Breathe by Travis Bedel


Here's an exercise you can use to begin to notice your breath or to find it again if it's become cloudy in your awareness. There are infinite ways to do this. As you change your attention use your mind to continue to notice, resisting any urge to judge or compliment. You may notice other sensations and movements that are not described here. The realm of the breath is infinite. For this exercise give value to all things you notice without qualifying them.

Sit somewhere quiet and in a comfortable position with your spine easily in neutral. 

Allow your body and mind to settle. 

Find a comfortable soft focus with your vision. Tune into your mind's eye. 

Let your breath move normally. You don't need to control it or change it.  Breathe here for several rounds until you feel like you can really place your mind solely on your breath. It may want to wander into daydream, sleep or to do lists- just notice those tendencies and stay with your breath.

For the next rounds of breathing place your attention on your nostrils. Notice the sensation of your breath as wind moving past your nostrils in both directions. Notice the temperature of your breath. Feel how the breath tells you the shape of your nostrils and breathing passageways. 

Return to just watching your breath from the bird's eye view of your mind, letting your mind remain empty except for noticing. 

For a few rounds place your attention on your rib cage. Feel the expansion of your rib cage on the in breath. Take in all the directions your ribs can expand placing your attention on the front, sides, back, top and bottom with no rush. Watch how the size and shape of your torso changes as you breath. Then place your attention on your out breath. Feel the ribs draw closer to the center line of your body and the sternum drop away from your chin.

Return to just watching your breath from the bird's eye view of your mind, letting your mind remain empty except for noticing. 

For the following rounds place your attention on your abdomen, the great space below your bell shaped rib cage housing all your viscera. Let your attention expand from your bottom ribs to your hip crests and pubic bone in the front. Watch what happens on the in breath and where your breath travels in your torso below your lungs. Stay with that for a moment. Let your attention travel to the back of your torso all the way from your lowest rib to your sitz bones -- feel the directions your torso expands on the in breath, where pressure might increase or decrease and what sensations caused by the in breath draw your attention.  

Then place your minds eye on your solar plexus right in the center of your torso. Still without changing anything, notice how your breath travels through your center, supports your center, changes the shape of your center and is also affected by your center. 

Sit quietly for a few more breaths with your minds eye just resting on the continuous tempo of your breathing. 

Expand with this extension series

Need to open your chest and strengthen your upper back? Stabilize your shoulder girdle and extend your spine? This series is for you! You will need a roller, overball or bolster. Remember to listen to your body while you work and move in a range that feels comfortable and pain free. Familiarize yourself with some of the muscles you are about to engage and understand flexion vs. extension when you read the rest of our Extension series


Cactus Variations

Lets start with a chest and shoulder opening stretch to prep your front body before moving into extension. Lie on your back with your spine in neutral. Knees can be bent or straight. Place your arms even with your shoulders and bend your elbows to a 90 degree angle. Take a few deep breaths here. Let your arms rest into gravity. This can also be done on a roller for more of a stretch. 


Variation One

When you feel ready begin to move your arms overhead bringing, your finger tips together overhead. Maintain the 90 degree bend in your elbows as you move. Return your arms to your cactus start position. Continue to breath deeply and move slowly. Repeat 4 times. 


Variation Two

Return to your original cactus position, elbows even with your shoulders. Keep your elbow on the floor and bent to 90 degrees. Start to rotate your upper arm so your finger tips point towards the ceiling and your forearms come off the floor. Continue rotating until your fingertips point down towards the tops of your feet. Reach out through your elbow points into width as you move. Return your arms to cactus. Repeat 4 times. 

Arching Over

Start by placing the ball, roller or bolster under the middle of your ribcage, right around the bottom tips of your shoulder blades. Bend your knees, feet flat on the mat with hands behind your head for support. With a long neck extend over the prop and feel your ribs fan open. Take an inhale in extension. On your exhale come back up towards neutral a bit. Inhale and return to extension. Repeat 5-10 times.


Flexion and Extension in Sphinx


Set up in sphinx position with your elbows under your shoulders, forearms parallel to each other, palms wide on the mat and legs long and connected. 


Keeping your legs long and reaching back, exhale and round your spine into flexion. Draw your abdominals in towards your spine and maintain width through your collar bones and shoulder girdle. 


Reaching out through your head and tail, inhale your spine into extension. Continue to maintain width and space in your shoulder girdle and spin your collar bones up towards the ceiling. 


Flight

This exercise has four steps. Take your time to complete each one carefully. Start lying down on your abdominals, legs long and connected underneath you, arms long by your side and a towel underneath your forehead for comfort. Keep the tops of your feet resting on the floor for the entire exercise. 

1. Start by noticing your shoulder blades naturally rounding forward over your ribcage and resting toward the floor. On an exhale open you collar bones away from the floor and feel your scapula engage onto the back of your ribs. 

2. Extend through the pinky line of your arms, feeling how your arms connect to the bottom tip of your scapula. Take care not to pull your shoulders aggressively down your back. Look for space and connectedness instead. 

3. Float your arms off of the floor until they are right beside your side seems with your palms facing in towards the center line of your body. Check in with your shoulder blades and collar bones to ensure they did not loose their width or start to roll forward. 

4. On an exhale draw your abdominal wall towards your spine and lengthen through the crown of your head so much that you bring your forehead one centimeter off the towel. There are no wrinkles in the back of your neck and you should feel connected through the center line of your torso from head to tail, as well as through the width of your shoulder girdle and mid back. 

Relax everything to the floor, allowing your shoulders to round forward. Repeat 10 times. For a variation, rotate your palms toward the floor and then the ceiling after Step 4. You can also add 1lb weights to this.

Kristen is in Step 4. of Flight. Notice the length and support through her torso and the space in the shoulder girdle. 

Kristen is in Step 4. of Flight. Notice the length and support through her torso and the space in the shoulder girdle. 

T is for Traps. 

Continue to lie on your abdominals with your forehead resting on the towel. Legs are long and connected underneath you and your arms extend out to a T level with your shoulder sockets .Flip your palms up, pointing your thumbs towards the ceiling and resting the pinky blade of your hand on the floor. 

Start by drawing your abdominal wall up away from the floor for support and then begin to reach out through your arms trying to increase your wing span. Continue reaching out as you float your arms up off the floor. You are looking to find equal parts up and out in the work in your arms and across your back. Return your arms to the floor but keep the stabilization through your torso. Repeat 12 times.

On your 12th one lift and hold and draw small circles. Circle 6 times in each direction, continuing to expand across the width of your chest and back.

Relax. To take a brief counter stretch before the next exercise, curl into child's pose. 

SWAN!

Lying on your abdominals, place your hands underneath your shoulders with your elbows in towards your body. Find a strong connection between the heel of your hand and the mat both on the pink finger and the thumb side. Draw your abdominal wall away from the floor.

Start by floating your head up in line with your spine. Connect to the length of your center line. 

Then extend forward through the crown of your head, arching your back up into extension while reaching long through your legs and pelvis. Keep your low belly drawing your hip points toward one another and resist collapsing into your lumbar spine. Check for no wrinkles in the back of your neck. Use the support of your arms as you need. You will feel your front ribs expand and your heart opening forward. 

Roll down and return your forehead to the mat. For an extra challenge pause half way to the mat in your roll down and lift your hands off the mat. Hold for a breath and then return your torso to the mat with your hands hovering. 

At the end of this series you should feel connected and open! Check out all of our at-home exercise instructions for a happier, healthier life!


Explore your core

Below are a few examples you can practice to connect to your 5 Crucial Core Functions. Once you have a clear experience of how to tap into these functions and movements on their own, you can access them in your daily life (as well as sports and exercise) for a dynamic, fluid, healthy core. 

1. Lengthen

It's important to make space and length in your torso for the health of what's inside it and to support common goals like good posture, healthy spines and strong abdominals. Let's practice finding length through axial elongation. 

Take a comfortable seat with your legs supported. You should feel you can sit on the center of your sitz bones (or ishcial tuberosities) with the natural curves of your spine in tact. (If you are stuck in a rounded position in your lumbar spine or lower back try putting some extra padding under your pelvis like a folded blanket or yoga block). Now imagine the plumb line of your torso or a center axis that runs from the crown of your head to the center of your pelvis. Hold on to this sense of center while you work. 

Inhale and lengthen along your center line feeling the crown of your head reach towards the ceiling and the center of your pelvis reach towards the floor.

Exhale and draw your navel gently toward your spine to wrap around and support your length. Hold on to the length you have gained and add to it with your next inhale.

Repeat eight times growing longer and longer while increasing support with each breath. While your torso will elongate the neutral curvature of your spine should not change or shift. 

2. Scoop

Scooping and stability compliment each other. We will focus on the scoop here and stability a little later, but realize you are utilizing both. 

Knee folds -Lie on your back with your knees bent, feet flat on the mat, hip socket distance apart, and your spine in neutral. As you begin your exhale draw your abdominals in towards your plumb line and the up slightly. As you continue your exhale fold your right knee over your right hip without loosing your abdominal scoop and maintaining a long neutral spine. Inhale your right foot back to the floor. Repeat to the left with your next exhale.

Make sure to utilize the first and second half of your exhale to engage your abdominal stability and scoop. 

Make sure to utilize the first and second half of your exhale to engage your abdominal stability and scoop. 

Continue alternating right and left. Use your hands to help you listen to what your core is up to. Try a few with your hands resting on your abdomen. Feel your abdominals draw in and up. Notice if your ribs want to splay or compress.

Place this shape under your pelvis, framing your tailbone.

Place this shape under your pelvis, framing your tailbone.


Then try a few making a triangle with your thumbs and forefingers. Place your hands under your pelvis framing your tailbone with that triangle. (Your fingers should stick out below your glutes). Keep the weight of your pelvis centered in your hands by using your abdominal scoop and engaging your core. Notice if your pelvis wants to roll right or left, tuck under towards your thumbs or over arch towards your fingertips. 


3. All Planes Movements

Your core articulates your spine into flexion (rounding your back), extension (arching your back), side bending, and rotation. You will need to keep your plumb line in your mind's eye here too!

Flexion and Extension

Start on hands and knees with your hands right underneath your shoulders and your knees directly underneath your hips. Elongate your center axis in both directions with your spine in neutral. 

Flexion or Cat Spine. 

Flexion or Cat Spine. 


On an exhale, keep your arms straight as you round your head and tail towards the ground and you curl your waist band up towards the sky. This is spinal flexion. Draw your belly in and up, hugging your organs to your spine. 


Inhale and arch your head and tail towards the sky making an even arch from skull to sacrum. This is spinal extension.


Extension or Cow Spine.

Extension or Cow Spine.

Continue with your breath for several rounds. Notice which parts of your spine don't like to move at all and which parts like to move more than their share. Try to initiate both flexion and extension from a very active and supported center, moving evenly through your whole spine. Avoid sinking into you shoulders by maintaining width across your collar bones in both positions. Feeling really advanced? Do this while hovering your knees 1 inch off the ground, keeping your thighs still. 


Side-bending with one leg extended

Esidebendlft.jpg


Return to your neutral quadruped with a long center line. Keeping your center line long and stable, extend your right leg back and tuck your toes under as though you were doing a plank. Stand strong through your right leg and check that your rib cage and pelvis are square to the floor. Maintain your position from the waist down and side bend by arcing the top of your head to the left. Find a long connection from your right heel, along the right side seam of your body to the crown of your head. Keeping your hips stable, pass through center and exhale to side bend to the right. Repeat 3 more times with the right leg extended and then switch to do 4 rounds on the left.

Note: It can be tempting, or even go unnoticed, that your spine will sneak into a small twist, flexion or extension while you are side bending. Imagine your torso is stuck between two planes of glass (one above and one below) while you work and you don't want to touch either as you move. As in flexion and extension, stay active in your reach out through your long leg as well as elongating your center in both directions. (See six limbs for more on this idea.)


Rotation

Keep your knees even with one another.

Keep your knees even with one another.

For this exercise you need a yoga block. Lie on your back with your knees bent and spine in neutral. Bring your legs to table top position and place the yoga block long ways between your shins. Place your arms long beside you with your palms firmly connected to the ground and your collar bones wide. 

Inhale to rotate your pelvis to the right unit your knees are even with your right shoulder or about 30 degrees. Keep your knees even, so one does not appear shorter than the other, as you squeeze the block. Maintain length through both sitz bones and your pubic bone as you twist.

Exhale as you bring your legs back to center. Inhale your pelvis and legs 30 degrees to the left and exhale back to center. Repeat for 10 sets.

If you feel your abdominals uncontrollably bunch or cannot keep the connection between your palms, shoulders and the ground, try lessening the amount you are rotating. Length and neutral spine are just as important here too!


4. Slow it down

Momentum is a great way to cheat your core out of good ol' hard work. (Don't get me wrong- command of momentum also features your core in some of it's most powerful moments.) Slow down your movements so you can notice your patterns, your tendencies and the good work you are doing. Moving slowly allows you to perfect your form. Then, once you are clear and ready, add speed when it's appropriate to the movement or goal you are training. 

The 10 Count Roll Up

Eroll ups middle.jpg

We are using literal seconds to time this one. If you are a speed demon, grab your watch, with a second hand, and a buddy. Your goal is to take the entire 10 seconds to roll up and another 10 seconds to roll down. No accelerating, no decelerating, no chopping with your arms or legs -- just slow, strong control.

Lie flat on your back with your legs extending and your arms reaching up to the sky directly over your shoulders. Inhale to elongate your plumb line in preparation. Keep the length in your plumb line as you exhale, nod and curl into your upper abdominal curl. Continue exhaling as you roll up through your spine to a seated position, bending your knees if you need. Keep your heels on the ground and your arms stable in front of your shoulders the whole way. Inhale in your seated position. Exhale as you roll back down, starting with your pelvis, rolling through your torso until you are long on the floor in your start position. It is helpful to count out loud!

5. Stabilize 

No movements. No micro movements. This means that all of the spinal movements you found above disappear. Let's practice stabilizing in neutral today but remember you want to also be able to stabilize in flexion and extension. 

Eforearmclose.jpg


For this exercise you will need a physio ball. Begin on your knees on a mat and place your elbows and forearms on top of the ball making a fist with your hands.

Step your feet and legs back into a plank position with your feet wider than hip distance. Hold your core still, elongating your center axis as you draw circles with your elbows 5 times in each direction. If this feels too hard and you cannot stabilize your spine, try the same thing with your knees down. If this feels too easy step your feet closer together. 

Draw small circles with your elbows keeping your spine totally still. Too hard? Put your knees down!

Draw small circles with your elbows keeping your spine totally still. Too hard? Put your knees down!

#corevalues is a series focused on the core and all of it's complexities. We encourage you to explore your core in and out of the studio!

Looking for more at home exercise tips? See Swan approved suggestions here!

you betta werk, feet

Here are some exercises to make your feet stronger and more articulate. For all of these exercises, try 8-10 repetitions. Once you become comfortable with that many, add additional sets.  

doming

Place your feet in parallel. Trying to keep your toes long (not scrunched). Dome your MTP joints up away from the floor. You should see the joints at the bases of your toes move up away from the ground, making an even rainbow of an arch from your big toe joint to your pinky toe joint. You should feel muscle activation underneath the sole of your foot. If you feel it all in your toes, you may be scrunching them too much!

point and flex

This one is self explanatory :). Sit with straight legs and find parallel, aligning the center of your hip socket, knee cap ankle and 2nd toe. Keeping your heel on the ground, straighten your legs fully and flex through your heels. Point long through your feet and toes without letting them veer in or out. Feel like each toe is making a long extension of its metatarsal. Repeat!

foot fan on ball

Place a pinky ball underneath your metatarsals, right before they become the ball of your foot. Keeping your heel grounded and knee stable, fan your foot from right to left. Use this motion to create more width and space in your feet as well as iron out any kinks you may feel underneath. Practice finding smooth motion and equal rage on both feet.

play the piano

Sit on a chair or on the floor and find parallel alignment with bent legs. Keeping the balls of your feet grounded, lift your toes away from the floor. Try to keep the heads of all metatarsals on the ground. Now try just lifting your big toes. Often times these toes will move in towards the other toes, but try to lift them straight up. Now try just lifting the middle three toes while keeping your big toes and pinky toes grounded. You may have to use your hands to keep them down. Now pick up all of your toes again and try to place one down at at time, starting with your pinkies. Make the motion smooth and try not to crunch your toes or let them veer away from the line of your metatarsal.  

relevé

Stand up, keeping parallel leg alignment. Place a ball in between your heels. Place your hands on a solid surface for stability. Rise up on to the balls of your feet.  Hold the ball and try not to scrunch your toes. When you rise up, try to do so by really going UP rather than merely shifting your weight forward. Keep looking for balance across the balls of your feet and think about making a connection from your sits bones to your heels. Make sure to stretch your calves after this exercise!


Calcaneus palpation/exercises

Let's try a couple exercises to get a better sense of your heel bones. If you have questions about the language in this post, look back at Meet Your Calcaneus.

First, have a seat, cross one ankle over the opposite leg and use your fingers to palpate (feel) your heel bone. How does the bone feel to you? Look at the pictures from the anatomy post and see if you can trace the whole length of the bone. Knowing that muscles, tendons and ligaments lie on top, imagine you can go below the tissue layer and really put your intention on the bone. Repeat on your other foot.

Heel rocks. Now stand on two feet in parallel (2nd toes pointing forward with kneecaps aligned--approximately :)). Take a moment to just feel your weight in your heel bones. You may feel slightly pronated or supinated. This is ok and normal! Shift your weight so you feel more on the outside of your right calcaneus and the inside of your left, then switch sides, repeating a few times. This may be easier on one side than the other. Now turn this side-to-side motion into a circle, 6-10 times in each direction. Try to make the circle smooth and feel as much of your heel into the floor as you can.

You might feel a little bit like this, but don't get too crazy:

Here's a trick for releasing. Often times, this can help with plantar fasciitis or tightness in the ankles and calves. Place a pinky ball right in front of your calcaneus, ever so slightly to the inside of your foot. Try to stand on both feet, putting as much weight into the foot with the pinky ball as in your other leg. This area may be VERY tight. Try to take 10 breaths here and let the tissue relax. Repeat on the other side. 

Stretch your calves! A good ol' calf stretch (standing in a shallow lunge) does wonders for releasing the calves and achilles, and can relieve tension through the plantar fascia of the feet. In your calf stretch, go back to your heel rocks and find the place where your calcaneus feels most evenly planted on the floor, finding weight in the back of your heel! Take 8 long breaths with a straight back leg, 8 with a bent back leg. Switch sides.